Helen’s New Luggage Rack
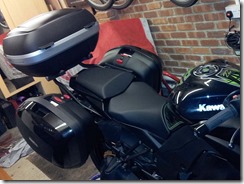
Yesterday I fitted Helen’s new Givi pannier rails and top box rack. Kawasaki don’t offer the option of a 3 box setup, you either have panniers or a top box but not both. Helen got the bike from Kawasaki with the panniers already fitted. When she bought the bike we were well aware that Givi made Kawasaki’s panniers at that time and so these panniers would fit on the Givi rails. The original pannier rails are really ugly and spoil the look of the bike when no luggage is fitted to it. The new rails are fitted with quick release bolts that allow the main parts of the rails to be removed from the bike when no luggage is required. As part of this new rail system you can also fit a top box rack as well., due to the way it is fitted this has to be fitted to the bike at all times. If you don’t want a top box than you require another kit of parts to be able to fit the rails instead.
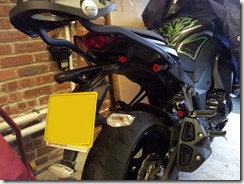
So I set about removing the Kawasaki rails first, one of the first bolts I tried to undo sheared off straight away. Looks like whoever fitted it, put it on far too tightly as the nut was rounded slightly and the allen key hex was also rounded. Fortunately I managed to get the nut and the broken off bolt thread out from the other side. Once that was out of the way I then removed the rest of the rails. The next problem came when I had to remove the bracket (different bracket for new kit) from under the seat. Givi had no instructions on how to actually get at the bolts to install this item. I managed to find some instruction elsewhere and then came across my next hurdle which was in the form of a pair of security screws. It would appear they were protecting access to the ECU, but they also stopped you dropping the under tail tray to get at the bracket. This is where the Dremel came to the rescue as I cut a groove in the top bolt and was then able to remove it was a flat bladed screwdriver. I didn’t need to remove the lower bolt as the under tray was now free. I then replaced the bracket under the tail and also had to install a new number plate and indicator bracket. The indicators have to be installed lower than on t he original setup as they would get in the way of the panniers being fitted. Kawasaki had already extended the wires for the other rails so that had saved me a small job, but I still had to disconnect all the wiring to change over the indicator brackets. Once they were all installed back on the bike and working I could then install the actual rails and rack. This was quite straight forward as Givi’s instructions were very well set out. I had no problems installing the rest of the kit and everything lined up perfectly once put together. The panniers now don’t stick out as far as they did on the Kawasaki rails and the whole luggage set up looks miles better. Also once the luggage is off and the rails removed the bike looks miles better as well. The photo above shows the bike with the rails removed, the red circles denote where the quick release rails locate. Once both rails are installed you then install a quick release bar between both rails that sits just behind the top of the number plate, this bar makes the rails very rigid indeed.
For anyone interested here is a list of the equipment that we installed to achieve this set up.
Givi PLXR4100 rapid release rails for V35 Monokey panniers.
Givi 4100FZ Monokey Top Box rack & M5 Plate
Givi V47NN Tech Top Box
Kawasaki Panniers (made by Givi and are V35 Panniers)


